Greetings...

Greetings...
Welcome to my little space in the world-wide web. Grab a cup of your favorite beverage, sit down and enjoy your trek. I am not sure what brought you here, but I am glad you came. I hope you find something you like and come back often to visit. Be sure to sign up on the right to recieve all updates via your email.

Just a Pinch

Showing posts with label Dessert. Show all posts

Friday, March 29, 2013

For the Love of Peanut Butter


I am not only a Chocolate Lover, but I also love Peanut Butter. So when I come across someone who doesn't like chocolate or peanut butter, I just assume they are broken. Ha, ha, ha. I’m just teasing. I always liked peanut butter and butter sandwiches or crackers. I was never a fan of peanut butter and jelly/jam sandwiches. Maybe I am broken. Ha, ha, ha. And "Oh my gosh!" Peanut butter on Italian Toast is to die for. There is something to be said about using just the right brand of Italian bread to make toast and then slather it with Jiff Peanut Butter while it is still warm. Watching the peanut butter melt and get all shiny, makes my mouth water just thinking about it.

As I child I remember buttering one saltine while slathering the peanut butter on to another saltine and then sandwiching them together for a snack. A simple but fulfilling snack for a small child and even better yet, that I could make it myself. I had some rather unusual eating habits as a child, but we will save those stories for another day.

When the teen years hit, there was nothing better than "You got your chocolate in my peanut butter!" Yup, you guessed it Reese’s Peanut Butter Cups, the darker version of a mallow cup. I have certainly eaten my share of those. It was during this time I made my first batch of home-made peanut butter cookies. I remember mixing up the dough, forming it into balls and then flattening them with a fork to make the criss/cross design. I am from a large family so doubling the batch was always a must. Otherwise they didn't last as long as the time it took to make them. By the end of my teen years, homemade peanut butter balls were all the rage and I still manage to make them every year at Christmas time.

As an adult I have to admit that one of my favorite peanut butter recipes is for Peanut Butter Pie. I have had the pleasure of trying two completely different versions. There is one with cream cheese and one with vanilla pudding. Both were delicious but I prefer the cream cheese version, probably because it contains more fat and all that sugary goodness. I will give you both recipes so you can try them for yourself and decide which Peanut Butter Pie you like better.


Cream Cheese Peanut Butter Pie 

1 deep dish or 2 reg pre-baked pie shell of your choice (this one is a deep dish)
2-8 oz. Philadelphia Cream Cheese
1/2 cup Powdered Sugar
1 Cup Peanut Butter, smooth or crunchy
2 reg sized container Cool Whip
1 cup chocolate chips, for drizzling
1 cup peanut butter. for drizzling
½ cup roasted peanuts, chopped

Beat cream cheese until smooth. Add powdered sugar, beat on low until combined. Add in peanut butter and again beat until combined. Add Cool Whip mix until combined. Spoon into pre-baked  pie crust.

Drizzle with melted chocolate and then with melted peanut butter. Sprinkle with crushed roasted peanuts.  Refrigerate for at least an hour before serving.


Peanut Butter  Cream Pie

1 Pie Crust, ready for filling (your choice)
1 box 3.4 oz. Vanilla Instant Pudding
1 pint Half-and-half
⅔ cups Peanut Butter, smooth or crunchy
1-½ cup Powdered Sugar
8 ounce Extra Creamy Cool Whip

Either purchase a pie crust or make a homemade one. I do either depending on amount of time I have.

Mix peanut butter and powdered sugar in a bowl with a fork until crumbly. Set aside.

Mix pudding with half and half, whisk for 2 minutes. Stir in 4 ounces of cool whip.
In the bottom of your crust dump 2/3′s of your peanut butter crumbles. Spread pudding over top, and top it off with a layer of the remaining cool whip.

Top with the leftover crumbles and chill for 1 hour before serving.  

Notes/Swaps
  • You can swap out the crust for a chocolate one, or even a graham cracker crust.  You choose your favorite crust.
  • Instead of using instant pudding you could make the cook-n-serve kind or you could make your own from scratch.
  • There are endless possibilities for topping your pie, try sprinkles, chocolate shavings, mini chocolate chips, chopped up Reese's Cups, Peanut M&M, Reese's Pieces.  
If you make one of these pies take a photo and send it to me.  I would love to see how your pie turned out.  

Another way to decorate this delicious pie.


For more recipes, click the button below:
For more recipes click the button above


Follow me on Facebook
 
Or find me on Pinterest
Ma's Aprong Strings on Pinterest

 Click this image to subscribe
Subscribe via Email
Join me on Google+
Join me on Google Plus


From the bottom of my heart.............. 


Wednesday, February 27, 2013

Cannoli Twisted


For those of you who have no idea what a Cannoli is......It is this wonderful Italian pastry made with a thin crunchy shell that has its own distinctive taste filled with a slightly sweet ricotta cheese filling with just a smidgen of semi-sweet chocolate chips or pistachios for decoration. If you can get your hands on the right kind of cannoli they are simply delicious. What is the right kind you ask? Well you have to figure that out for yourself. You will find there are no two places that make them alike. Some use different flavorings, some make different shells, my only advice is to taste test until your heart is content. Once you find that golden Cannoli that suits your tastes like no other, you will revisit the bakery often to quell your Cannoli cravings.
 

In the area where I live we are fortunate to have a large number of Italian decent settle in a nearby city. Wow, did they bring some great recipes with them. Numerous businesses have since come and gone highlighting many of those recipes. However, there are a few that are still in business and making those traditional recipes. Here is a link to order from the bakery that makes my favorite Cannoli:   Florentine's Bakery .They also have a large array of other appetizing and scrumptious tasting goodies that will make your taste buds hurry through dinner just to taste the dessert.

 
It has taken me several years and attempts to even come close to a copycat recipe. To tell the truth I never really tried too hard because I could just take a trip into the city and buy them. Now that I only work part-time, I have plenty of time on my hands to experiment.

 
As I stated above, I had tried a few times earlier to make them from scratch with not so great success. It is hard to duplicate the ricotta needed for the recipe. In researching many cannoli recipes I found that many use mascarpone or a mixture of different soft cheeses. Others talk about a drier special made ricotta which is hard to find these days. After several attempts I found that just draining the ricotta overnight wasn't always long enough. Still more of them use different ingredients all together and all this was just for the filling.
 

Next came the shells. Again, many different recipes, some using similar ingredients while others used different ingredients. Depending on the taste you are looking for. Again, I had attempted in making my own shells a few times. It was a little difficult finding the forms to make the shells, but once I found them they were cheap enough. However, the outcome was not to the success I had hoped for. A little time consuming, a lot of fiddling, and needed to acquire the knack of making the dough, putting it on the form and then manage to find the trick in deep frying them and keeping the dough on the form while doing so. Whew! Let's try some of those already made shells I have seen in a box in numerous stores.
 

Pre-made boxed Cannoli shells are sold in several stores in the city and in three different brands. Let's do a taste test of the three. Almost comparable to Goldie-locks and three bears, except my hair is graying and with any luck the cannoli shells will taste a heck of a lot better than porridge. Found a box while shopping one day good chance to try my luck at making them again. This attempt turned out okay. The shell tasted fine but the filling was overly sweet.
 

Let’s go onto to the next attempt using much less sugar. Dilemma! When I went back to the store to get more shells there was a different kind. Attempt number two resulted in failure. Although they were edible I found the filling to be good but the cannoli shell wasn't that great.

Back to the store again to see if I could find the first cannoli shell. What the hell, no such luck. Several stores later, still no such luck. Began to wonder if I had imagined the blue box, after all I had thrown it out and couldn't even remember the name. Thank god for the computer and my great ability to search for items. Yup found them, but before ordering on-line I had one more store in the city to check. This store had three kinds of shells, the two I had tried previously and another one that come in a fancy box labeled gourmet. My curiosity got the better of me. Picked up a box of the ones I had been looking for and a box of gourmet ones to try.

 
Cannoli shells number one in the blue box turned out to be quite yummy and my personal favorite. They are made by Ferrara.  Box number two, greasy and a little over cooked (sorry Lynne, you were given samples of the second attempt). Box number three tasted okay but not as good as the ones in the blue box.

Dilemma number two. What do I do with all the broken bits from the Cannoli shells? Why not try a deconstructed Cannoli? Works for the chefs on the television, use the same or like ingredients to recreate a new outcome that dazzle's the taste buds and is a feast for the eyes. I think I did pretty well. What do you think?
 
1 16-oz. container of ricotta, drained 24 hours in a cheese cloth, in sieve over a bowl.
1 tsp. vanilla
1/4 cup powdered sugar
1/4 tsp. cinnamon
mini chocolate chips
Small dark chocolate cups
Broken Cannoli Shells, crushed into crumbs
Fresh Berries of you choice, straw berry, raspberry, black berries
Ricotta
Place cheesecloth into sieve and place sieve over a bowl. Pour ricotta into cheesecloth. Fold over cheesecloth to cover ricotta. Place in refrigerator for minimum of 24 hours. Ricotta needs to be dry in order for recipe to turn out well. If it is not dry, you will need to drain it longer or try squeezing out some of the liquid by twisting the cheese cloth.
 
Filling
When ready to make filling, remove ricotta from refrigerator and let it come to room temperature. Place ricotta into mixing bowl. add vanilla, powdered sugar, cinnamon. Mix until incorporated. Batter should be of thick consistency. Stir in couple of tablespoon of mini chocolate chips. Place into ziploc bag or tupper container and place back in the refrigerator until ready to use.
You can pipe or spoon cannoli filling into chocolate cups. Sprinkle cannoli shell crumbs over filling. Pressing them into the filling if you need to. Top with a fresh berry of your choice. Refrigerate until ready serve.


For more recipes, click the button below:

For more recipes click the button above


Follow me on Facebook
 
Or find me on Pinterest
Ma's Aprong Strings on Pinterest
 
 Click this image to subscribe
 
Subscribe via Email
 
Join me on Google+
 
Join me on Google Plus


From the bottom of my heart.............. 


Saturday, June 23, 2012

Mixing it up with Eclairs

Why not take a normal every day recipe and mix it up.  Today I decided to mix it up with an Éclair recipe.

Change it from this one lonely Éclair


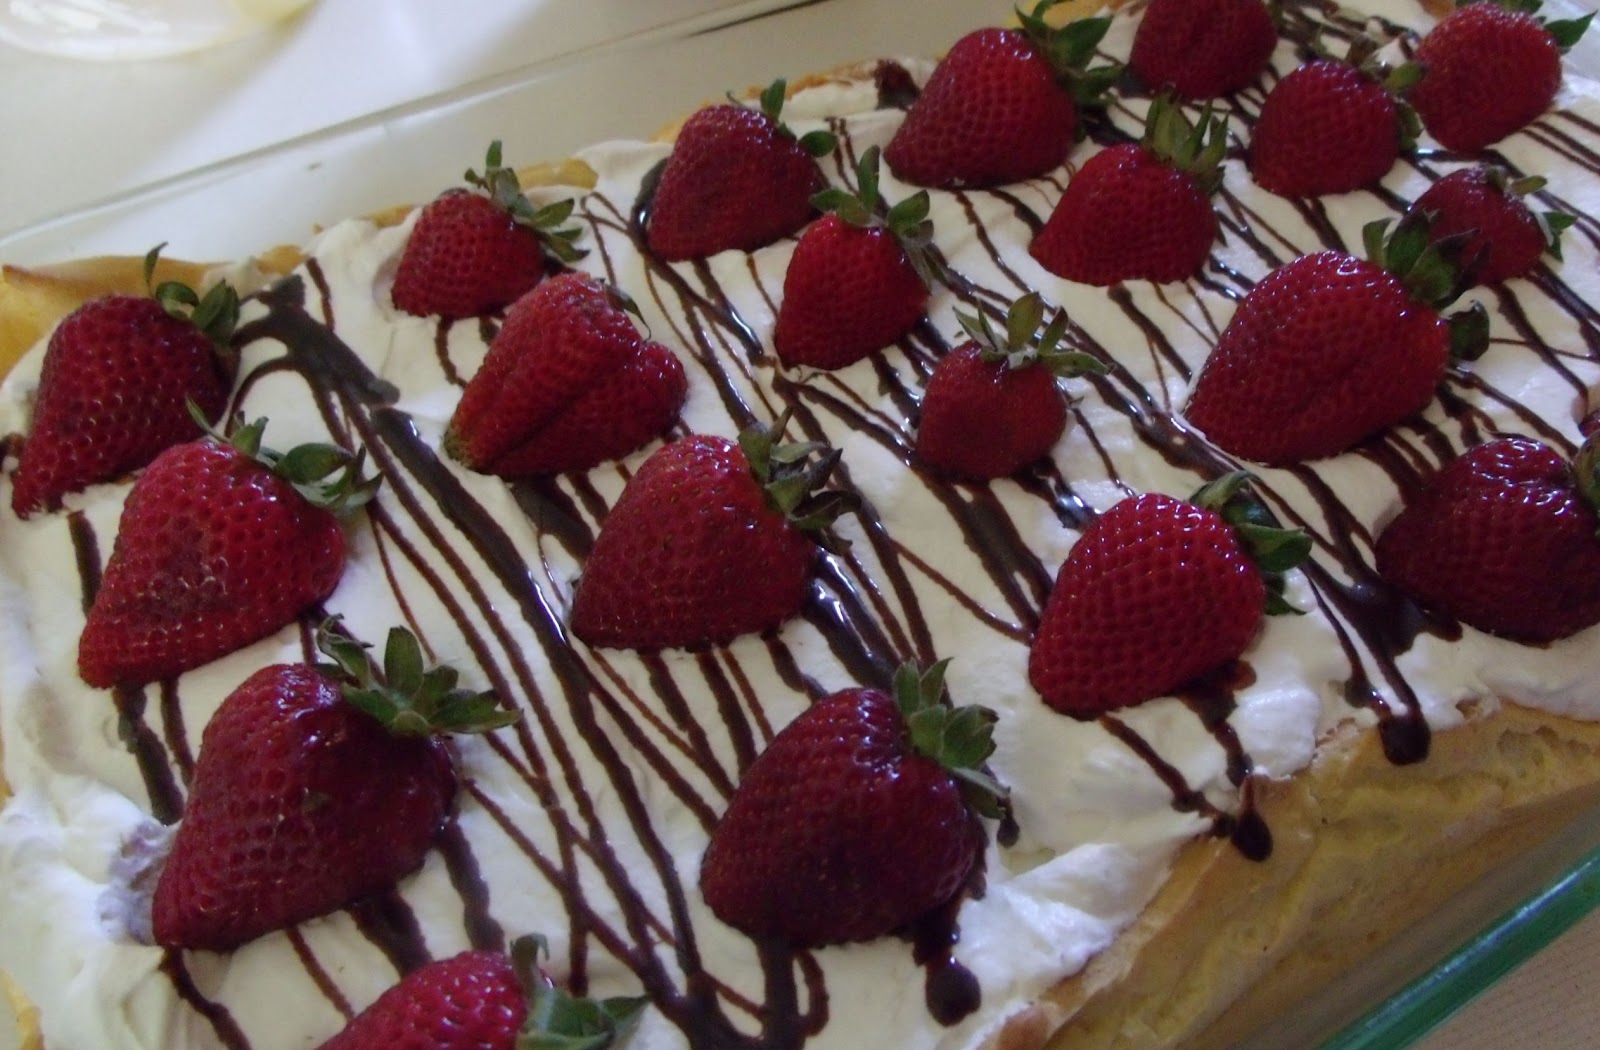
to this decadent Éclair Cake topped with Fresh Strawberries


Did I mention this makes a great take along for any family dinner, potluck, or party dessert.   Even though it looks like a lot of trouble to go to, it is not.  I would rate this as an easy recipe although it has a few steps to create the end product.

Chocolate Éclair Cake

Ingredients:
1 cup water
1/2 cup butter
1 cup flour
4 large eggs
1 (8 ounce) package cream cheese, softened and room temperature
1 large box (5.1 ounces) vanilla instant pudding
2 cup milk
Heavy cream to make one batch of homemade whipped cream (or cool whip)
Hershey’s chocolate syrup

Fresh Strawberries

Instructions:
Preheat oven to 400 degrees.  Lightly grease a 9"X13" glass baking pan.

Crust:

In a medium saucepan, melt butter in water and bring to a boil. Remove from heat. Using a wooden spoon, stir in the flour. Once flour is combined, mix in one egg at a time. Mix each egg completely before adding another egg.  Spread mixture into 9x13 pan, covering the bottom and bringing the batter up the sides.  Do this as evenly as you possibly can. If the sides of your pan are too greased you won't be able to get the mixture to stay up the sides so make sure to just lightly grease.

Bake for 30-40 minutes or until golden brown.  I check it occasionally: starting at 20 minutes.  You don't want to overcook the crust.   Remove from oven and let cool (don't touch or push bubbles down).


Filling:

In separate bowls make vanilla pudding using only 2 cups of milk. In second bowl beat cream cheese  until soft.  Make sure pudding is thick before mixing in with cream cheese.  Slowly add pudding to cream cheese, mixing until there are no lumps. Let cool in refrigerator.  When the crust is completely cooled, pour filling in and spread it around evenly, being careful not to pop or squish the bubbled areas.  


The layer of pudding and cream cheese filling.

Whipped Cream:
1 pint heavy whipping cream
1 tsp. vanilla extract
3 tbsp. powdered sugar

Keep heavy cream very cold until ready to beat it.   Pour into chilled bowl and mix on high.  While it is mixing add the vanilla and powdered sugar.    Beat until medium soft peaks are formed (do not over beat or you will have butter).

Once whipped cream is ready top pudding/cream cheese layer with layer of  whip cream. Drizzle with chocolate syrup.  Decorate with fresh strawberries or chocolate dipped strawberries. 


Layer on the whipped cream

Drizzsle with chocolate syrup or not.

Top with fresh strawberris.
   

Keep refrigerated until ready to serve and refrigerate all leftovers if you have any.

Notes:
Why not try this with chocolate pudding instead of vanilla.  Or make it completely strawberry by leaving out the chocolate and mixing a few crushed berries or seedless jam into the pudding and cream cheese mixture.    

Get the recipe here...........

Click on recipe to open photo.  Right click on photo to save to your computer for printing. 


For more recipes, click the button below:

For more recipes click the button above


Follow me on Facebook
 
Or find me on Pinterest
Ma's Aprong Strings on Pinterest

 Click this image to subscribe
Subscribe via Email
Join me on Google+
Join me on Google Plus


From the bottom of my heart.............. 


Thursday, June 21, 2012

Building Blocks

Building blocks come in many different shapes and sizes.  The important thing about playing with blocks is to make a strong and sturdy foundation when stacking your blocks.    When it comes to making strawberry shortcakes it is important to make good shortcakes to build your layers upon.  This is my favorite recipe for biscuits.   I promise you won’t be disappointed.  

Fresh picked strawberries direct from Candela's


Touch of Grace Biscuits
Recipe by Shirley Corriher,author of BakeWise and CookWise

  • 2 cups Tenda-Bake® Self-Rising Flour (I used the type found in the local grocery store and it worked just fine)
  • 1/4 cup sugar
  • 1/2 teaspoon salt
  • 4 tablespoons shortening
  • 2/3 cup cream
  • About 3/4 cup buttermilk or more as needed
  • 1 cup Tenda-Bake® All Purpose Flour, for shaping
  • 2 tablespoons butter, melted

Preheat oven to 425 degrees F. Spray a 9-inch cake pan with nonstick cooking spray.

Combine self-rising flour, sugar and salt. Work shortening in with your fingers until there are no large lumps. Stir in cream, then buttermilk, until it resembles cottage cheese. (Very sticky) Add more buttermilk, if needed.

Spread all-purpose flour in shallow pan. Scoop dough (use a #30) into flour. Coat with flour, gently shape into a round, shaking off excess flour. Place biscuit into prepared pan, do not leave space between biscuits. Continue scooping and shaping until the pan is full.

Bake until lightly browned, 20 to 25 minutes. Brush with melted butter, invert onto plate, then back onto another. Cut biscuits to serve. Makes 12 to 14 biscuits.

If you really want to switch up your biscuit trying making them with chocolate (add two tablespoons of good unsweetened cocoa powder to the mix).

So now that you have the foundation made.  Let’s start to stack the layers.

Start with a pretty dish

Place your foundation


Strawberry Filling:

·          1 quart strawberries, hulled and cut into bite size pieces

·          1/3 cup of sugar

·          1 tsp. vanilla extract

·          2 tbsp. lemon juice


Make sure your berries taste good. Strawberries can be misleading; they often look scrumpdelicious and taste bad. In a pinch you can use frozen ones too, but fresh really does taste the best.  Clean, cut and mix above ingredients and let them set for 10-15 minutes. Once you add the sugar to the berries they will make their own juice. 

If you find they look a little dry or didn’t make much of their own juice you can add 2-3 tablespoons of one of the following liquids: 

·          orange juice

·          balsamic vinegar

·          wine

·          Liquor of your choice. 


Or switch it up entirely by using a different berry such as, raspberries, black raspberries, black berries, cherries, etc.

Top with berries.

Add a layer of ice cream.

Toppings:

Your favorite vanilla ice cream

Vanilla pudding

Whipped Cream


Toppings come in many choices as well.  Why not try a layer of vanilla or chocolate pudding, your favorite ice cream.


Why not?  Add yet another layer of berries.

Top with whipped cream.
Top with one lonely berry.

Decorate with a chocolate covered strawberry, chocolate shavings, or chocolate jimmies’.  

I hope I have inspired you to experiment when making your strawberry short cake and that you enjoy the end results.  


For more recipes, click the button below:

For more recipes click the button above
 

Follow me on Facebook
 
Or find me on Pinterest
Ma's Aprong Strings on Pinterest
 
 Click this image to subscribe
 
Subscribe via Email
 
Join me on Google+
 
Join me on Google Plus


From the bottom of my heart..............